Mise à jour majeure de PVE7 à PVE8

Logo Proxmox
Logo Proxmox PVE8

Intro

Je partage ici le parcours effectué pour la mise à jour Proxmox en PVE8, à partir de la version 7 de Proxmox Virtuel Environment.
N’hésitez pas à laisser un commentaire ou poser une question, je m’efforcerai d’y répondre.

Architecture

A date, je possède un cluster 3 nœuds physiques (PVE1 à PVE3) à base de NUC Intel en Core I5 Gen4 et Core I3 Gen7) avec 16Go de RAM et 128 ou 256Go de stockage local SSD.

La sauvegarde est assurée par un PBS en VM à base de 2Sockets-1Core, le stockage de la sauvegarde repose sur un disque HDD 1To en USB2. Le tout sur le nœud PVE1.

Stratégie retenue

  • Commencer par le PVE3 seul,
  • Déplacer les VM de PVE3 sur le nœud PVE2,
  • Procéder à l’upgrade PBS plus tard, afin d’assurer le retour arrière,
  • Suivre à la lettre la partie « In-place upgrade » du wiki Proxmox : https://pve.proxmox.com/wiki/Upgrade_from_7_to_8

Dans les grandes lignes :

  • Déplacer les VM de PVE3,
  • Réaliser les upgrades à la dernière version PVE v7,
  • Utiliser l’utilitaire pve7topve8 mis gracieusement(consciencieusement) par la communauté Promox 🙂 ,
  • Mettre à jour,
  • Enchaîner sur le nœud suivant.

Premier nœud

Lancer l’utilitaire pve7topve8 qui nous donne un résultat plutôt positif, comme par exemple :

root@pve3:~#  pve7to8 --full
= CHECKING VERSION INFORMATION FOR PVE PACKAGES =

Checking for package updates..
PASS: all packages up-to-date

Checking proxmox-ve package version..
PASS: proxmox-ve package has version >= 7.4-1

Checking running kernel version..
PASS: running kernel '5.15.116-1-pve' is considered suitable for upgrade.

= CHECKING CLUSTER HEALTH/SETTINGS =

PASS: systemd unit 'pve-cluster.service' is in state 'active'
PASS: systemd unit 'corosync.service' is in state 'active'
PASS: Cluster Filesystem is quorate.

Analzying quorum settings and state..
INFO: configured votes - nodes: 3
INFO: configured votes - qdevice: 0
INFO: current expected votes: 3
INFO: current total votes: 3

Checking nodelist entries..
PASS: nodelist settings OK

Checking totem settings..
PASS: totem settings OK

INFO: run 'pvecm status' to get detailed cluster status..

= CHECKING HYPER-CONVERGED CEPH STATUS =

SKIP: no hyper-converged ceph setup detected!

= CHECKING CONFIGURED STORAGES =

PASS: storage 'PBS1' enabled and active.
PASS: storage 'isos' enabled and active.
PASS: storage 'local' enabled and active.
PASS: storage 'local-lvm' enabled and active.
SKIP: storage 'usbdata' disabled.
INFO: Checking storage content type configuration..
PASS: no storage content problems found
PASS: no storage re-uses a directory for multiple content types.

= MISCELLANEOUS CHECKS =

INFO: Checking common daemon services..
PASS: systemd unit 'pveproxy.service' is in state 'active'
PASS: systemd unit 'pvedaemon.service' is in state 'active'
PASS: systemd unit 'pvescheduler.service' is in state 'active'
PASS: systemd unit 'pvestatd.service' is in state 'active'
INFO: Checking for supported & active NTP service..
PASS: Detected active time synchronisation unit 'chrony.service'
INFO: Checking for running guests..
PASS: no running guest detected.
INFO: Checking if the local node's hostname 'pve3' is resolvable..
INFO: Checking if resolved IP is configured on local node..
PASS: Resolved node IP 'xxx.xxx.xxx.3' configured and active on single interface.
INFO: Check node certificate's RSA key size
PASS: Certificate 'pve-root-ca.pem' passed Debian Busters (and newer) security level for TLS connections (4096 >= 2048)
PASS: Certificate 'pve-ssl.pem' passed Debian Busters (and newer) security level for TLS connections (2048 >= 2048)
INFO: Checking backup retention settings..
PASS: no backup retention problems found.
INFO: checking CIFS credential location..
PASS: no CIFS credentials at outdated location found.
INFO: Checking permission system changes..
INFO: Checking custom role IDs for clashes with new 'PVE' namespace..
PASS: no custom roles defined, so no clash with 'PVE' role ID namespace enforced in Proxmox VE 8
INFO: Checking if LXCFS is running with FUSE3 library, if already upgraded..
SKIP: not yet upgraded, no need to check the FUSE library version LXCFS uses
INFO: Checking node and guest description/note length..
PASS: All node config descriptions fit in the new limit of 64 KiB
PASS: All guest config descriptions fit in the new limit of 8 KiB
INFO: Checking container configs for deprecated lxc.cgroup entries
PASS: No legacy 'lxc.cgroup' keys found.
INFO: Checking if the suite for the Debian security repository is correct..
NOTICE: found unusual suites that are neither old 'bullseye' nor new 'bookworm':
    found suite bullseye/ at in /etc/apt/sources.list.d/netdata.list:1
  Please ensure these repositories are shipping compatible packages for the upgrade!
NOTICE: found no suite mismatches, but found at least one strange suite
INFO: Checking for existence of NVIDIA vGPU Manager..
PASS: No NVIDIA vGPU Service found.
INFO: Checking bootloader configuration...
SKIP: not yet upgraded, no need to check the presence of systemd-boot

= SUMMARY =

TOTAL:    36
PASSED:   30
SKIPPED:  4
WARNINGS: 0
FAILURES: 0
root@pve3:~# 

NB : la remarque sur la supervision Netdata (qui est installée) et que l’on risque d’avoir besoin d’intervenir sur les sources des dépôts concernées.
En ce qui me concerne, il faudra effectivement vérifier si la version Bookworm (Debian 12) est bien disponible et modifier la source en conséquence :

deb http://repo.netdata.cloud/repos/stable/debian/ bullseye/ 

Comme on peut le vérifier, Netdata dispose bien d’une version Debian 12 sur ses repos : https://repo.netdata.cloud/repos/stable/debian/bookworm/

Modifier les sources des dépôts

Pour Promox et une installation « standard », suivre le wiki : https://pve.proxmox.com/wiki/Upgrade_from_7_to_8#Update_the_configured_APT_repositories

Pour Netdata, une simple mise à jour de /etc/apt/sources.list.d/netdata.list suffit :

deb http://repo.netdata.cloud/repos/stable/debian/ bookworm/ 

Lancer un update :

root@pve3:/etc/apt# apt update
Hit:1 http://security.debian.org bookworm-security InRelease
Hit:2 http://ftp.fr.debian.org/debian bookworm InRelease                           
Hit:3 http://ftp.fr.debian.org/debian bookworm-updates InRelease                   
Get:4 http://repo.netdata.cloud/repos/stable/debian bookworm/ InRelease [1,299 B]  
Hit:5 http://download.proxmox.com/debian/pve bookworm InRelease           
Get:6 http://repo.netdata.cloud/repos/stable/debian bookworm/ Packages [55.6 kB]
Fetched 56.9 kB in 1s (79.4 kB/s)   
Reading package lists... Done
Building dependency tree... Done
Reading state information... Done
597 packages can be upgraded. Run 'apt list --upgradable' to see them.
root@pve3:/etc/apt# 

C’est là que l’on voit qu’il y a un peu de boulot 😉

A priori, on est prêt pour la mise à jour Proxmox en PVE8 !

On passe aux choses sérieuses, upgrade !

apt dist-upgrade

Ça se passe bien… jusqu’à ceci :

...
Get:682 http://download.proxmox.com/debian/pve bookworm/pve-no-subscription amd64 zfs-initramfs all 2.1.12-pve1 [24.7 kB]
Get:683 http://download.proxmox.com/debian/pve bookworm/pve-no-subscription amd64 zfsutils-linux amd64 2.1.12-pve1 [489 kB]
Get:684 http://download.proxmox.com/debian/pve bookworm/pve-no-subscription amd64 zfs-zed amd64 2.1.12-pve1 [65.3 kB]
Fetched 575 MB in 14s (40.9 MB/s)
E: Failed to fetch http://ftp.fr.debian.org/debian/pool/main/c/cpio/cpio_2.13%2bdfsg-7.1_amd64.deb Undetermined Error [IP: 212.27.32.66 80]
E: Failed to fetch http://ftp.fr.debian.org/debian/pool/main/i/isc-dhcp/isc-dhcp-client_4.4.3-P1-2_amd64.deb Error reading from server - read (104: Connection reset by peer) [IP: 212.27.32.66 80]
E: Unable to fetch some archives, maybe run apt-get update or try with --fix-missing?
root@pve3:/etc/apt#

On pourrait croire que les dépôts Debian sont en RTT… Et bien, non !
Cela semble être lié aux changement de liens vers les dépôts.

Il suffit de relancer un apt dist-upgrade et là c’est OK 🙂

Un gros changelog est à lire, il suffit de naviguer vers le bas, avec le pavé flèches, pour arriver à cela :

...
Regular expressions with stray backslashes now cause warnings, as
their unspecified behavior can lead to unexpected results.
For example, '\a' and 'a' are not always equivalent
https://bugs.gnu.org/39678. Similarly, regular expressions or
subexpressions that start with a repetition operator now also cause
warnings due to their unspecified behavior; for example, *a(+b|{1}c)
now has three reasons to warn. The warnings are intended as a
transition aid; they are likely to be errors in future releases.

Regular expressions like [:space:] are now errors even if
POSIXLY_CORRECT is set, since POSIX now allows the GNU behavior.

-- Santiago Ruano Rincón santiago@debian.org Tue, 06 Sep 2022 15:29:49 +0200
(press q to quit)

On quitte donc.

Certaines questions seront posées pendant la mise à jour, tel que décrit sur le wiki : https://pve.proxmox.com/wiki/Upgrade_from_7_to_8#Upgrade_the_system_to_Debian_Bookworm_and_Proxmox_VE_8.0

A moins d’avoir modifié certains fichiers de configurations en toute connaissance de cause, on peut accepter de remplacer par la version du mainteneur, quand cela est demandé.
Cela permet de ne pas « traîner » des paramètres obsolètes d’une version à l’autre, et qui mènent immanquablement à des failles de sécurité !
Finalement, cela revient aussi à s’approcher d’une installation « fraîche », comme à partir d’une source ISO.

NB :En cas de doute, il préférable de verifier les différences entre les 2 versions des fichiers, à chaque fois.

Et de toutes façons, en cas de besoin plus tard, les fichiers précédents sont sauvegardés en .bak dans le dossier d’origine.

Accepter aussi le redémarrage des services pour ne pas rester devant l’écran à valider chaque demande 🙂 )

L’installation prendra environ 10mn et rend la main à la fin, on est en version 8 de PVE !!

Cependant, la version du noyau en cours est toujours la même (5.15.xx), un redémarrage s’impose donc pour passer à la vérification de tous les services.

root@pve3~# pveversion
pve-manager/8.0.4/d258a813cfa6b390 (running kernel: 5.15.116-1-pve)
root@pve3~#

Redémarrage


Après un :

root@pve3~# reboot

et un court moment…

Linux pve3 6.2.16-12-pve #1 SMP PREEMPT_DYNAMIC PMX 6.2.16-12 (2023-09-04T13:21Z) x86_64

The programs included with the Debian GNU/Linux system are free software;
the exact distribution terms for each program are described in the
individual files in /usr/share/doc/*/copyright.

Debian GNU/Linux comes with ABSOLUTELY NO WARRANTY, to the extent
permitted by applicable law.
Last login: Sun Sep 10 15:14:03 CEST 2023 from xxx.xxx.xxx.99 on pts/0
root@pve3:~#

PVE8 est Up and Running !!

Recette

Système

  • Migration d’une VM dans l’autre sens,
  • VABF,
  • Test de sauvegarde de cette VM,
  • Test de restauration,
  • VABF,
  • Migrations des VM restantes.
  • VABF.

Réseau

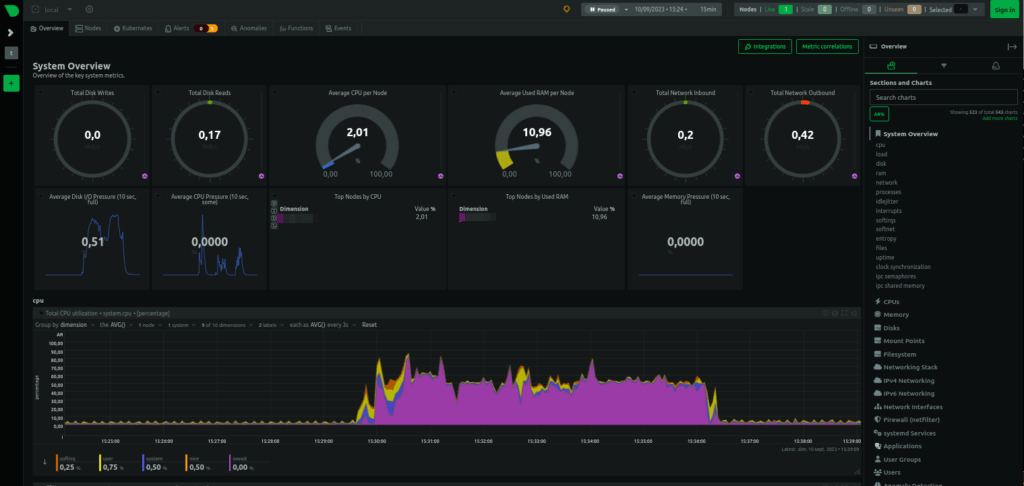
Vérification des ports en écoute :

lsof -nP -iTCP -sTCP:LISTEN

Une navigation vers Netdata (sur le port 19999 en http, par défaut) nous donnes un magnifiiiiique tableau de bord, tout neuf :

Tableau de bord Netdata
Tableau de bord Netdata utilisé sur mon serveur Proxmox

Les nœuds suivants

Après des vérifications approfondies, on pourra procéder de la même manière pour les 2 autres nœuds du cluster.

Un prochain article traitera de la mise à jour de PBS (Proxmox Backup Server) de la v2 à la V3.

Sources

Entretiens et Astuces VFR1200

Réinitialisation du CDI/ECU

Démarche à suivre

  • Déconnexion de la batterie pendant 10 minutes, reconnecter la batterie et puis remise en route sans toucher l’accélérateur et laisser tourner le moteur au ralenti jusqu’au premier démarrage du ventilateur et puis l’arrêt.
    Le tout prend  +/-15 min au total.
  • Il faut attendre que le ventilo tourne et attendre qu’il s’arrête… (Cela évite une pointe de température au moteur)
  • Couper le contact ensuite.


Opération terminée.

Sources

Réinitialisation CDI/ECU : https://www.forumvfr1200.com/t9-R-initialisation-du-CDI.htm?q=reinit+dct

Oneliner GNU/Linux

Trouver les gros consommateurs dans /home

Les 10 plus gros répertoires avec du :

sudo du /home -h -- * | sort -rh | head -10
for i in G M K;do sudo du -ah | grep [0-9]$i | sort -nr -k 1; done | head -n 11

Les 10 plus gros fichiers avec find :

sudo find /home -printf '%s %p\n'| sort -nr | head -10 | numfmt --to=iec-i --suffix=B

Sources d’inspiration

https://unix.stackexchange.com/questions/44040/a-standard-tool-to-convert-a-byte-count-into-human-kib-mib-etc-like-du-ls1

Netdata : la supervision complète, temps réel et locale

(globalement obsolète en 2023…)

Sous Debian 9 en général

   apt-get install zlib1g-dev uuid-dev libmnl-dev gcc make git autoconf autoconf-archive autogen automake pkg-config curl

   cd /opt

   git clone https://github.com/firehol/netdata.git --depth=1

   cd netdata

   ./netdata-installer.sh

   apt-get install zlib1g-dev uuid-dev libmnl-dev gcc make git autoconf autoconf-archive autogen automake pkg-config curl libuv1-dev

   ./netdata-installer.sh

   apt-get install zlib1g-dev uuid-dev libmnl-dev gcc make git autoconf autoconf-archive autogen automake pkg-config curl libuv1-dev cmake

   ./netdata-installer.sh

   firewall-cmd --permanent --zone=public --add-port=19999/tcp

   service firewalld restart

Sous PROXMOX VE 6.2x

Version simple et stable

Vous devriez avoir cet environnement, ou approchant avec Proxmox 6.2x installé à partir de l’ISO :

user@pve:~# sudo cat /etc/os-release

PRETTY_NAME="Debian GNU/Linux 10 (buster)"

NAME="Debian GNU/Linux"

VERSION_ID="10"

VERSION="10 (buster)"

VERSION_CODENAME=buster

ID=debian

HOME_URL="https://www.debian.org/"

SUPPORT_URL="https://www.debian.org/support"

BUG_REPORT_URL="https://bugs.debian.org/"

user@pve:~# 

Dans ce cas, c’est simple :

sudo apt -y install netdata

mais, le hic, c’est la version 1.12 de février 2019 qui est installée, au mois de mai 2020 !!

Pour bénéficier de la version à jour de Netdata

(tout en gardant la stabilité de « buster stable » pour Proxmox !)

On commence par mettre là jour le cache des packages :

sudo apt update

Sous Debian, on installe le debian-archive-keyring pour que les dépôts officiels Debian soient validés :

sudo apt install debian-archive-keyring

On vérifie ensuite que les outils nécessaire sont bien présents :

sudo apt install curl gnupg apt-transport-https

POur installer un nouveau dépot deb, on doit d’abord installer la clé GPG utilsée pour signer les metadata du dépot. On peut fait cela avec l’utilitaire apt-key :

curl -L https://packagecloud.io/netdata/netdata/gpgkey | sudo apt-key add -

On créé ensuite un fichier appelé /etc/apt/sources.list.d/netdata_netdata.list qui contient le configuration du dépôt comme suit :

Si votre distribution est différente, adaptez la valeurs en fonction des Distribution et versions supportées :

deb https://packagecloud.io/netdata/netdata/debian/ buster main
deb-src https://packagecloud.io/netdata/netdata/debian/ buster main

Mettre à jour le cache APT :

sudo apt update

L’installation peut maintenant etre faite à partir du nouveau dépôt :

sudo apt -y install netdata 

Editer ensuite la configuration

root@pve:~# nano /etc/netdata/netdata.conf 

Dans la section [web], éditer le port à exposer pour accéder à Netdata à distance

[web]
     web files owner = root
     web files group = netdata
 # by default do not expose the netdata port
 bind to = 192.168.x.x # Port accessible sur le LAN

Redémarrer ensuite Netdata

root@pve:~# systemctl restart netdata

Pour accéder à le WebUI à distance

http://192.168.x.x:19999/

Sources

https://packagecloud.io/netdata/netdata/install#manual-deb

SQL Max Memory Calculator

SQLMEM

(SQL Max Memory Calculator)

This CodePlex project is a simple forms application that will allow you to easily calculate the maximum SQL Server memory according to MS best practices

By Default, SQL Server is set to use max 2TB of Ram, however I am sure that in 2013 no one has that much! This effectively means that SQL can consume all of the RAM in your server leaving nothing for the OS or other applications. This can cause performance issues. Here is how Thomas Larock, from SQL Rockstar explains it:

SQL Server (and other database systems such as Oracle and Sybase) need to read data pages into their internal memory before they can be used. Of course your server needs memory to operate as well. When your database engine and your server are competing for the same memory resources, you get bad performance. You want your server and your database engine to be like dancing partners, and less like my kids fighting over the last cupcake


There is a nice formula to define how much RAM you should dedicate to all the SQL instances on the server, to make sure there is enough left for the OS but… unfortunately it’s not easy!

  • SQL Max Memory = TotalPhyMem – (NumOfSQLThreads * ThreadStackSize) – (1GB * CEILING(NumOfCores/4)) – OS Reserved 
  • NumOfSQLThreads = 256 + (NumOfProcessors*- 4) * 8 (* If NumOfProcessors > 4, else 0) 
  • ThreadStackSize = 2MB on x64 or 4 MB on 64-bit (IA64) 
  • OS Reserved = 20% of total ram for under if system has 15GB. 12.5% for over 20GB

I know, it’s not easy, and what I think it’s missing is a part really dedicated for the OS. To help you set the correct values, I developed this utility that let’s you easily calculate how much Memory you actually got available for all your SQL instances. 

Exemple

Pour un serveur SQL Server 2016 de 6 CPU et 24Go de RAM allouée :

NumOfSQLThreads = 256 + (6 – 4) * 8, donc 272Mo
ThreadStackSize = On est en x64 donc 2Mo 
OS Reserved = Pour 24Go de RAM, donc 3Go

On a donc :
SQL Max Memory = 24Go – 576Mo – 2Go – 3Go = 18,5G Maxi !

Sources

https://archive.codeplex.com/?p=sqlmem

Cachet : une page de statut des services

(Globalement obsolète en 2023)

Objet

Cachet is software that improves downtime.

Great companies all over the world are using Cachet to better communicate downtime and system outages to their customers, teams and shareholders.
Cachet est une page de statut des services

Conditions préalables

To run Cachet on your CentOS 7 system you will need a couple of things:

  • PHP version 7.1 or greater
  • HTTP server with PHP support (eg: Nginx, Apache, Caddy)
  • Composer
  • A supported database: MySQL, PostgreSQL or SQLiteGit

Exigences

  • A CentOS 7 operating system.
  • A non-root user with sudo privileges.

Préliminaires

  • (A compléter)

Installation – Etape 1

Verify installed version of CentOS :

cat /etc/centos-release

Ajouter votre user en sudoers :

sudo usermod -aG wheel <votreuser>

Set up the timezone:

timedatectl list-timezonessudo timedatectl set-timezone 'Region/City'

Update your operating system packages (software). This is an important first step because it ensures you have the latest updates and security fixes for your operating system’s default software packages:

sudo yum upgdate -y

Install some essential packages that are necessary for basic administration of the CentOS operating system:

sudo yum install -y curl wget vim git unzip socat bash-completion

Installing PHP on CentOS 8

CentOS 8 is distributed with PHP 7.2. This version supports most of the modern PHP applications, but will no longer be actively maintained as of November 2019. The newer PHP versions are available from the Remi repository.

Enable the Remi repository

If you’re going to install the distro stable PHP version 7.2, skip this step. Otherwise, if you want to install PHP 7.3 or 7.4 enable the Remi repository by running the following command as root or user with sudo privileges:

sudo dnf install dnf-utils http://rpms.remirepo.net/enterprise/remi-release-8.rpm

The command above will also enable the EPEL repository.

Once the installation is complete, run the command below to get a list of all available PHP versions:

sudo dnf module list php

The output will show a list of all available modules, including the associated stream, version, and installation profiles.

Last metadata expiration check: 0:02:11 ago on Fri 18 Oct 2019 08:31:43 PM UTC.
CentOS-8 - AppStream
Name    Stream       Profiles                     Summary                 
php     7.2 [d][e]   common [d], devel, minimal   PHP scripting language  

Remi's Modular repository for Enterprise Linux 8 - x86_64
Name    Stream       Profiles                     Summary                 
php     remi-7.2     common [d], devel, minimal   PHP scripting language  
php     remi-7.3     common [d], devel, minimal   PHP scripting language  
php     remi-7.4     common [d], devel, minimal   PHP scripting language  

Hint: [d]efault, [e]nabled, [x]disabled, [i]nstalled

The default PHP module is set to PHP 7.2. To install a newer PHP release, enable the appropriate version:

PHP 7.3

sudo dnf module reset php
sudo dnf module enable php:remi-7.3

PHP 7.4

sudo dnf module reset php
sudo dnf module enable php:remi-7.4

You are now ready to install PHP on your CentOS server.

Install PHP

The following command will install PHP and some of the most common PHP modules:

sudo dnf install php php-opcache php-gd php-curl php-mysqlnd php-json php-simplexml php-xml php-mbstring php-tokenizer

FPM is installed as a dependency and used as FastCGI server. Start the FPM service and enable it to automatically start on boot:

sudo systemctl enable --now php-fpm

Configuring PHP to work with Apache

If SELinux is running on your system, you’ll need to update the SELinux security context:

sudo chcon -t httpd_sys_rw_content_t /var/www

If you are using Apache as your web server, restart the httpd service using the following command, and you are good to go:

sudo systemctl restart httpd

Configuring PHP to work with Nginx (nouse)

By default, PHP FPM runs as user apache. To avoid permission issues, we’ll change the user to nginx. To do so, edit the lines highlighted in yellow:

sudo nano /etc/php-fpm.d/www.conf

/etc/php-fpm.d/www.conf

...
user = nginx
...
group = nginx

Copy

Make sure the /var/lib/php directory has the correct ownership:

chown -R root:nginx /var/lib/php

Once done, restart the PHP FPM service:

sudo systemctl restart php-fpm

Next, edit the Nginx virtual host directive, and add the following location block so that Nginx can process PHP files:

server {

    # . . . other code

    location ~ \.php$ {
        try_files $uri =404;
        fastcgi_pass unix:/run/php-fpm/www.sock;
        fastcgi_index index.php;
        fastcgi_param SCRIPT_FILENAME $document_root$fastcgi_script_name;
        include fastcgi_params;
    }
}

Copy

For the new configuration to take effect, restart the Nginx service:

sudo systemctl restart nginx

Update the SELinux security context:

sudo chcon -tR httpd_sys_rw_content_t /var/www

Conclusion

PHP 7.2 is available for installation from the default CentOS 8 repositories. If you want to install more recent version you need to enable the Remi repository.

Tests

Add php test page:

echo '<?php phpinfo();' | sudo tee /var/www/html/info.php

Browse to your server IP on http://localhost/info.php to see php in action.

Enjoy using PHP 7.2 on CentOS 8 / RHEL 8

By default, CentOS 8/RHEL 8 forbids public access to port 80. To allow other computers to access the web page, we need to open port 80 in firewalld, the dynamic firewall manager on RHEL/CentOS. Run the following command to open port 80.

firewall-cmd --permanent --zone=public --add-service=http

If you want to enable HTTPS on Apache later, then you also need to open port 443.

firewall-cmd --permanent --zone=public --add-service=https

The --permanent option will make this firewall rule persistent across system reboots. Next, reload the firewall daemon for the change to take effect.

systemctl reload firewalld

Now the Apache web page is accessible publicly.

Finally, we need to make user apache as the owner of web directory. By default it’s owned by the root user.

chown apache:apache /var/www/html -R

Step 2 – Installing MariaDB

Now, it’s time to install the database server

sudo yum install mariadb-server mariadb

When the MariaDB is installed, issue the command below to start it

sudo systemctl start mariadb

Enable auto start at system boot time.

systemctl enable mariadb

Check status:

systemctl status mariadb

output:

● mariadb.service - MariaDB 10.3 database server
   Loaded: loaded (/usr/lib/systemd/system/mariadb.service; enabled; vendor preset: disabled)
   Active: active (running) since Sat 2019-10-12 09:02:53 UTC; 33s ago
     Docs: man:mysqld(8)
           https://mariadb.com/kb/en/library/systemd/
 Main PID: 18608 (mysqld)
   Status: "Taking your SQL requests now..."
    Tasks: 30 (limit: 5092)
   Memory: 77.0M
   CGroup: /system.slice/mariadb.service
           └─18608 /usr/libexec/mysqld --basedir=/usr

Enabled” indicates that auto start at boot time is enabled and we can see that MariaDB server is running. Now we need to run the security script.

mysql_secure_installation

When it asks you to enter MariaDB root password, press Enter key as the root password isn’t set yet. Then enter y to set the root password for MariaDB server.

install mariadb on redhat 8 centos 8

Next, you can press Enter to answer all remaining questions, which will remove anonymous user, disable remote root login and remove test database. This step is a basic requirement for MariaDB database security. (Note that the letter Y is capitalized, which means it’s the default answer.)

mysql_secure_installation rhel8 centos8

Now you can run the following command and enter MariaDB root password to log into MariaDB shell.

mysql -u root -p
mariadb shell login

Connect to MariaDB shell as the root user:

sudo mysql -u root -p
# Enter password

Create an empty MariaDB database and user for Cachet and remember the credentials:

MariaDB> CREATE DATABASE cachet;
MariaDB> GRANT ALL ON cachet.* TO 'dbuser_cachet' IDENTIFIED BY 'password';
MariaDB> FLUSH PRIVILEGES;

To exit, run

exit;

Step 3 – Install Acme.sh client and obtain Let’s Encrypt certificate (optional)

Securing your website with HTTPS is not necessary, but it is a good practice to secure your site traffic. In order to obtain a TLS certificate from Let’s Encrypt we will use acme.sh client. Acme.sh is a pure UNIX shell software for obtaining TLS certificates from Let’s Encrypt with zero dependencies. 

Download and install acme.sh:

sudo su - root
git clone https://github.com/Neilpang/acme.sh.git
cd acme.sh 
./acme.sh --install --accountemail your_email@example.com
source ~/.bashrccd ~

Check acme.sh version:

acme.sh --version
# v2.8.0

Obtain RSA and ECC/ECDSA certificates for your domain/hostname:

# RSA 2048
acme.sh --issue --standalone -d example.com --keylength 2048
# ECDSA
acme.sh --issue --standalone -d example.com --keylength ec-256

If you want fake certificates for testing you can add --staging flag to the above commands.

After running the above commands, your certificates and keys will be in:

  • For RSA/home/username/example.com directory.
  • For ECC/ECDSA/home/username/example.com_ecc directory.

To list your issued certs you can run:

acme.sh --list

Create a directory to store your certs. We will use the /etc/letsencrypt directory.

mkdir -p /etc/letsecnrypt/example.com
sudo mkdir -p /etc/letsencrypt/example.com_ecc

Install/copy certificates to /etc/letsencrypt directory.

# RSA
acme.sh --install-cert -d example.com --cert-file /etc/letsencrypt/example.com/cert.pem --key-file /etc/letsencrypt/example.com/private.key --fullchain-file /etc/letsencrypt/example.com/fullchain.pem --reloadcmd "sudo systemctl reload nginx.service"
# ECC/ECDSA
acme.sh --install-cert -d example.com --ecc --cert-file /etc/letsencrypt/example.com_ecc/cert.pem --key-file /etc/letsencrypt/example.com_ecc/private.key --fullchain-file /etc/letsencrypt/example.com_ecc/fullchain.pem --reloadcmd "sudo systemctl reload nginx.service"

All the certificates will be automatically renewed every 60 days.

After obtaining certs exit from root user and return back to normal sudo user:

exit

Step 5 – Install Composer

Install Composer, the PHP dependency manager globally:

php -r "copy('https://getcomposer.org/installer', 'composer-setup.php');"
php -r "if (hash_file('sha384', 'composer-setup.php') === 'c5b9b6d368201a9db6f74e2611495f369991b72d9c8cbd3ffbc63edff210eb73d46ffbfce88669ad33695ef77dc76976') { echo 'Installer verified'; } else { echo 'Installer corrupt'; unlink('composer-setup.php'); } echo PHP_EOL;"
php composer-setup.php
php -r "unlink('composer-setup.php');"
sudo mv composer.phar /usr/local/bin/composer

If the code above no longer run correctly, go to there : https://getcomposer.org/download/

When instalation is finished, check Composer version:

composer --version
# Composer version 1.8.4 2019-02-11 10:52:10

Step 6 – Install Cachet

Create a document root directory where Cachet should reside in:

sudo mkdir -p /var/www/cachet

Change ownership of the /var/www/cachet directory to {your_user}:

sudo chown -R {your_user}:{your_user} /var/www/cachet

NOTEReplace {your_user} with your initially created non-root user username.

Navigate to the document root directory:

cd /var/www/cachet

Download the Cachet source code with Git:

git clone -b 2.4 --single-branch https://github.com/cachethq/Cachet.git .

Copy .env.example to .env file and configure database and APP_URL settings in .env file:

cp .env.example .env
nano .env

Install Cachet dependencies with Composer:

composer install --no-dev -o

Up to 5 minutes of installation….

Ignore errors (!!)

Set up the application key by running:

php artisan key:generate

Install Cachet:

php artisan cachet:install

Now, run the command below to generate a new virtualhost for web application:

sudo nano /etc/httpd/conf.d/status.yourdomain.com.conf

Once this file opens, add the content below:

<VirtualHost *:80>
    ServerAdmin admin@yourdomain.fr
    DocumentRoot"/var/www/cachet/public"
    ServerName status.yourdomain.com
    ServerAlias www.status.yourdomain.com
    <Directory "/var/www/cachet/public">
        Options Indexes FollowSymLinks
        AllowOverrideAll
        Order allow,deny
        Allow from all
        Requireall granted
    </Directory>
    ErrorLog"/var/log/httpd/status.yourdomain.com-error_log"
    CustomLog"/var/log/httpd/status.yourdomain.com-access_log" combined
</VirtualHost>

Restart Apache :

sudo systemctl restart httpd

Open your site in a web browser and follow the instructions on the screen to finish Cachet installation.

Sources