(Globalement obsolète en 2023)
Objet
Cachet is software that improves downtime.
Great companies all over the world are using Cachet to better communicate downtime and system outages to their customers, teams and shareholders.
Cachet est une page de statut des services
Conditions préalables
To run Cachet on your CentOS 7 system you will need a couple of things:
- PHP version 7.1 or greater
- HTTP server with PHP support (eg: Nginx, Apache, Caddy)
- Composer
- A supported database: MySQL, PostgreSQL or SQLiteGit
Exigences
- A CentOS 7 operating system.
- A non-root user with sudo privileges.
Préliminaires
Installation – Etape 1
Verify installed version of CentOS :
cat /etc/centos-release
Ajouter votre user en sudoers :
sudo usermod -aG wheel <votreuser>
Set up the timezone:
timedatectl list-timezonessudo timedatectl set-timezone 'Region/City'
Update your operating system packages (software). This is an
important first step because it ensures you have the latest updates and
security fixes for your operating system’s default software packages:
sudo yum upgdate -y
Install some essential packages that are necessary for basic administration of the CentOS operating system:
sudo yum install -y curl wget vim git unzip socat bash-completion
Installing PHP on CentOS 8
CentOS
8 is distributed with PHP 7.2. This version supports most of the modern
PHP applications, but will no longer be actively maintained as of
November 2019. The newer PHP versions are available from the Remi repository.
Enable the Remi repository
If
you’re going to install the distro stable PHP version 7.2, skip this
step. Otherwise, if you want to install PHP 7.3 or 7.4 enable the Remi
repository by running the following command as root or user with sudo privileges:
sudo dnf install dnf-utils http://rpms.remirepo.net/enterprise/remi-release-8.rpm
The command above will also enable the EPEL repository.
Once the installation is complete, run the command below to get a list of all available PHP versions:
sudo dnf module list php
The output will show a list of all available modules, including the associated stream, version, and installation profiles.
Last metadata expiration check: 0:02:11 ago on Fri 18 Oct 2019 08:31:43 PM UTC.
CentOS-8 - AppStream
Name    Stream       Profiles                     Summary
php     7.2 [d][e]   common [d], devel, minimal   PHP scripting language

Remi's Modular repository for Enterprise Linux 8 - x86_64
Name    Stream       Profiles                     Summary
php     remi-7.2     common [d], devel, minimal   PHP scripting language
php     remi-7.3     common [d], devel, minimal   PHP scripting language
php     remi-7.4     common [d], devel, minimal   PHP scripting language

Hint: [d]efault, [e]nabled, [x]disabled, [i]nstalled
The default PHP module is set to PHP 7.2. To install a newer PHP release, enable the appropriate version:
PHP 7.3
sudo dnf module reset php
sudo dnf module enable php:remi-7.3
PHP 7.4
sudo dnf module reset php
sudo dnf module enable php:remi-7.4
You are now ready to install PHP on your CentOS server.
Install PHP
The following command will install PHP and some of the most common PHP modules:
sudo dnf install php php-opcache php-gd php-curl php-mysqlnd php-json php-simplexml php-xml php-mbstring php-tokenizer
FPM is installed as a dependency and used as FastCGI server. Start the FPM service and enable it to automatically start on boot:
sudo systemctl enable --now php-fpm
Configuring PHP to work with Apache
If SELinux is running on your system, you’ll need to update the SELinux security context:
sudo chcon -t httpd_sys_rw_content_t /var/www
If you are using Apache as your web server, restart the httpd service using the following command, and you are good to go:
sudo systemctl restart httpd
Configuring PHP to work with Nginx (nouse)
By default, PHP FPM runs as user apache. To avoid permission issues, we’ll change the user to nginx. To do so, edit the lines highlighted in yellow:
sudo nano /etc/php-fpm.d/www.conf
/etc/php-fpm.d/www.conf
...
user = nginx
...
group = nginx
Copy
Make sure the /var/lib/php directory has the correct ownership:
chown -R root:nginx /var/lib/php
Once done, restart the PHP FPM service:
sudo systemctl restart php-fpm
Next, edit the Nginx virtual host directive, and add the following location block so that Nginx can process PHP files:
server {

    # . . . other code

    location ~ \.php$ {
        try_files $uri =404;
        fastcgi_pass unix:/run/php-fpm/www.sock;
        fastcgi_index index.php;
        fastcgi_param SCRIPT_FILENAME $document_root$fastcgi_script_name;
        include fastcgi_params;
    }
}
Copy
For the new configuration to take effect, restart the Nginx service:
sudo systemctl restart nginx
Update the SELinux security context:
sudo chcon -tR httpd_sys_rw_content_t /var/www
Conclusion
PHP
7.2 is available for installation from the default CentOS 8
repositories. If you want to install more recent version you need to
enable the Remi repository.
Tests
Add php test page:
echo '<?php phpinfo();' | sudo tee /var/www/html/info.php
Browse to your server IP on http://localhost/info.php to see php in action.
Enjoy using PHP 7.2 on CentOS 8 / RHEL 8
By default, CentOS 8/RHEL 8 forbids public access to port 80. To
allow other computers to access the web page, we need to open port 80 in
firewalld, the dynamic firewall manager on RHEL/CentOS. Run the
following command to open port 80.
firewall-cmd --permanent --zone=public --add-service=http
If you want to enable HTTPS on Apache later, then you also need to open port 443.
firewall-cmd --permanent --zone=public --add-service=https
The --permanent option will make this firewall rule
persistent across system reboots. Next, reload the firewall daemon for
the change to take effect.
systemctl reload firewalld
Now the Apache web page is accessible publicly.
Finally, we need to make user apache as the owner of web directory. By default it’s owned by the root user.
chown apache:apache /var/www/html -R
Step 2 – Installing MariaDB
Now, it’s time to install the database server
sudo yum install mariadb-server mariadb
When the MariaDB is installed, issue the command below to start it
sudo systemctl start mariadb
Enable auto start at system boot time.
systemctl enable mariadb
Check status:
systemctl status mariadb
output:
● mariadb.service - MariaDB 10.3 database server
   Loaded: loaded (/usr/lib/systemd/system/mariadb.service; enabled; vendor preset: disabled)
   Active: active (running) since Sat 2019-10-12 09:02:53 UTC; 33s ago
     Docs: man:mysqld(8)
           https://mariadb.com/kb/en/library/systemd/
 Main PID: 18608 (mysqld)
   Status: "Taking your SQL requests now..."
    Tasks: 30 (limit: 5092)
   Memory: 77.0M
   CGroup: /system.slice/mariadb.service
           └─18608 /usr/libexec/mysqld --basedir=/usr
“Enabled” indicates that auto start at boot time is
enabled and we can see that MariaDB server is running. Now we need to
run the security script.
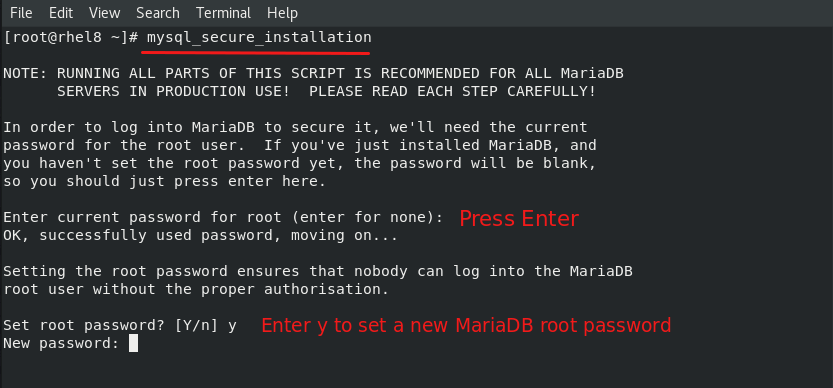
mysql_secure_installation
When it asks you to enter MariaDB root password, press Enter key as the root password isn’t set yet. Then enter y to set the root password for MariaDB server.
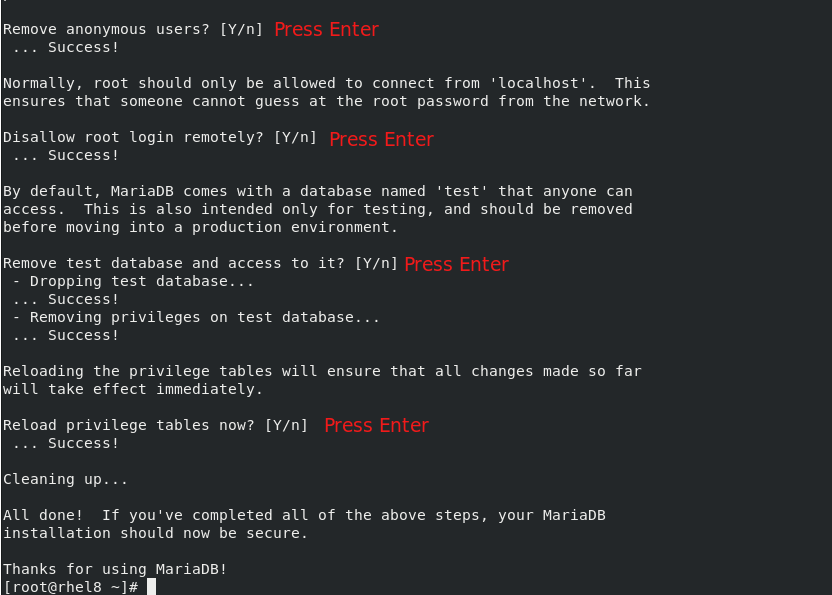
Next, you can press Enter to answer all remaining questions, which
will remove anonymous user, disable remote root login and remove test
database. This step is a basic requirement for MariaDB database
security. (Note that the letter Y is capitalized, which means it’s the default answer.)
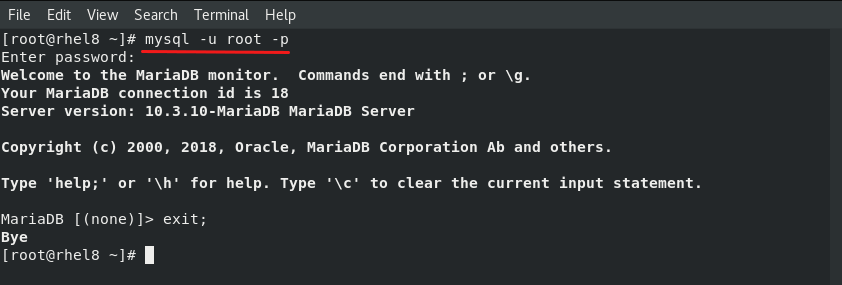
Now you can run the following command and enter MariaDB root password to log into MariaDB shell.
mysql -u root -p
Connect to MariaDB shell as the root user:
sudo mysql -u root -p
# Enter password
Create an empty MariaDB database and user for Cachet and remember the credentials:
MariaDB> CREATE DATABASE cachet;
MariaDB> GRANT ALL ON cachet.* TO 'dbuser_cachet' IDENTIFIED BY 'password';
MariaDB> FLUSH PRIVILEGES;
To exit, run
exit;
Step 3 – Install Acme.sh client and obtain Let’s Encrypt certificate (optional)
Securing your website with HTTPS is not necessary, but it is a good
practice to secure your site traffic. In order to obtain a TLS
certificate from Let’s Encrypt we will use acme.sh client. Acme.sh is a
pure UNIX shell software for obtaining TLS certificates from Let’s
Encrypt with zero dependencies.
Download and install acme.sh:
sudo su - root
git clone https://github.com/Neilpang/acme.sh.git
cd acme.sh
./acme.sh --install --accountemail your_email@example.com
source ~/.bashrccd ~
Check acme.sh version:
acme.sh --version
# v2.8.0
Obtain RSA and ECC/ECDSA certificates for your domain/hostname:
# RSA 2048
acme.sh --issue --standalone -d example.com --keylength 2048
# ECDSA
acme.sh --issue --standalone -d example.com --keylength ec-256
If you want fake certificates for testing you can add --staging flag to the above commands.
After running the above commands, your certificates and keys will be in:
- For RSA:
/home/username/example.com directory.
- For ECC/ECDSA:
/home/username/example.com_ecc directory.
To list your issued certs you can run:
acme.sh --list
Create a directory to store your certs. We will use the /etc/letsencrypt directory.
mkdir -p /etc/letsecnrypt/example.com
sudo mkdir -p /etc/letsencrypt/example.com_ecc
Install/copy certificates to /etc/letsencrypt directory.
# RSA
acme.sh --install-cert -d example.com --cert-file /etc/letsencrypt/example.com/cert.pem --key-file /etc/letsencrypt/example.com/private.key --fullchain-file /etc/letsencrypt/example.com/fullchain.pem --reloadcmd "sudo systemctl reload nginx.service"
# ECC/ECDSA
acme.sh --install-cert -d example.com --ecc --cert-file /etc/letsencrypt/example.com_ecc/cert.pem --key-file /etc/letsencrypt/example.com_ecc/private.key --fullchain-file /etc/letsencrypt/example.com_ecc/fullchain.pem --reloadcmd "sudo systemctl reload nginx.service"
All the certificates will be automatically renewed every 60 days.
After obtaining certs exit from root user and return back to normal sudo user:
exit
Step 5 – Install Composer
Install Composer, the PHP dependency manager globally:
php -r "copy('https://getcomposer.org/installer', 'composer-setup.php');"
php -r "if (hash_file('sha384', 'composer-setup.php') === 'c5b9b6d368201a9db6f74e2611495f369991b72d9c8cbd3ffbc63edff210eb73d46ffbfce88669ad33695ef77dc76976') { echo 'Installer verified'; } else { echo 'Installer corrupt'; unlink('composer-setup.php'); } echo PHP_EOL;"
php composer-setup.php
php -r "unlink('composer-setup.php');"
sudo mv composer.phar /usr/local/bin/composer
If the code above no longer run correctly, go to there : https://getcomposer.org/download/
When instalation is finished, check Composer version:
composer --version
# Composer version 1.8.4 2019-02-11 10:52:10
Step 6 – Install Cachet
Create a document root directory where Cachet should reside in:
sudo mkdir -p /var/www/cachet
Change ownership of the /var/www/cachet directory to {your_user}:
sudo chown -R {your_user}:{your_user} /var/www/cachet
NOTE: Replace {your_user} with your initially created non-root user username.
Navigate to the document root directory:
cd /var/www/cachet
Download the Cachet source code with Git:
git clone -b 2.4 --single-branch https://github.com/cachethq/Cachet.git .
Copy .env.example to .env file and configure database and APP_URL settings in .env file:
cp .env.example .env
nano .env
Install Cachet dependencies with Composer:
composer install --no-dev -o
Up to 5 minutes of installation….
Ignore errors (!!)
Set up the application key by running:
php artisan key:generate
Install Cachet:
php artisan cachet:install
Now, run the command below to generate a new virtualhost for web application:
sudo nano /etc/httpd/conf.d/status.yourdomain.com.conf
Once this file opens, add the content below:
<VirtualHost *:80>
    ServerAdmin admin@yourdomain.fr
    DocumentRoot"/var/www/cachet/public"
    ServerName status.yourdomain.com
    ServerAlias www.status.yourdomain.com
    <Directory "/var/www/cachet/public">
        Options Indexes FollowSymLinks
        AllowOverrideAll
        Order allow,deny
        Allow from all
        Requireall granted
    </Directory>
    ErrorLog"/var/log/httpd/status.yourdomain.com-error_log"
    CustomLog"/var/log/httpd/status.yourdomain.com-access_log" combined
</VirtualHost>
Restart Apache :
sudo systemctl restart httpd
Open your site in a web browser and follow the instructions on the screen to finish Cachet installation.
Sources